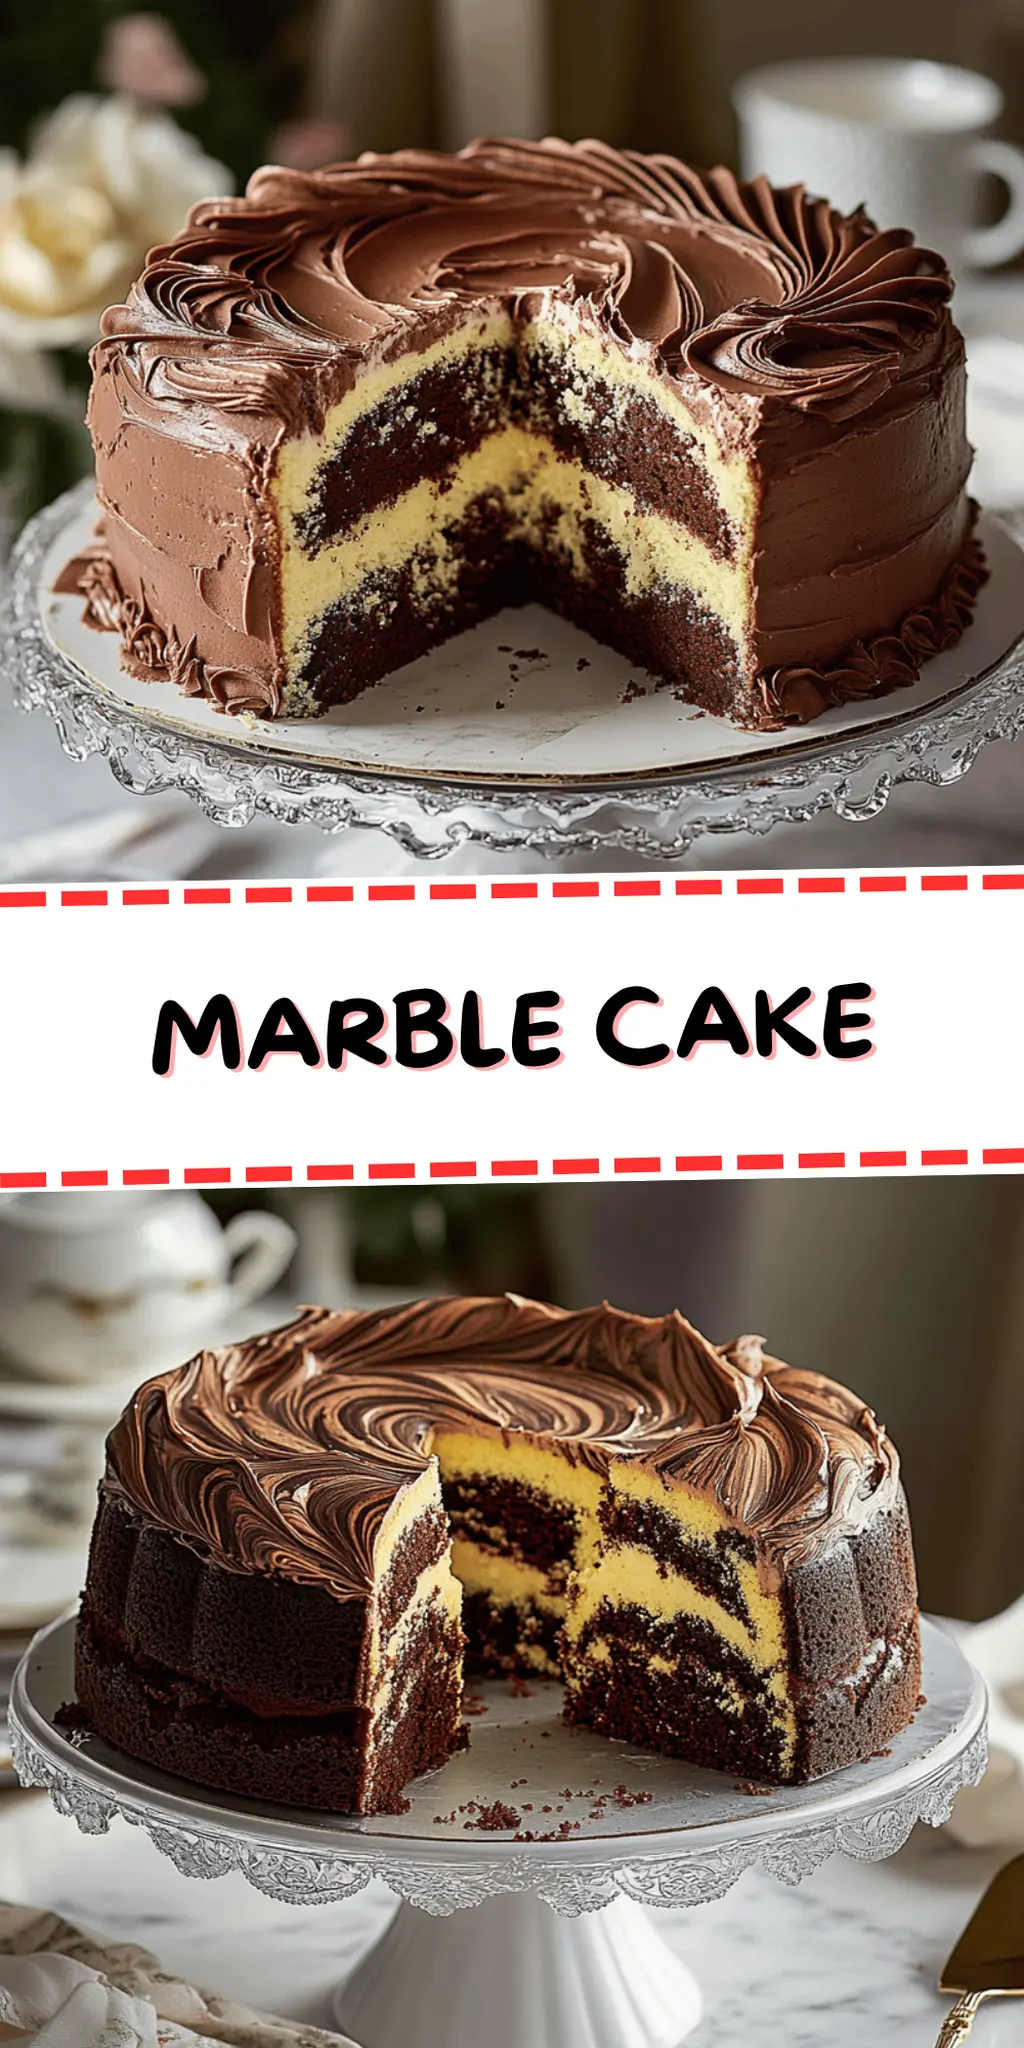
The thought of a warm slice of Marble Cake brings a wave of nostalgia, instantly reminding me of cozy family gatherings. Picture this: the sweet aroma of vanilla and chocolate mingling in the kitchen, creating an inviting atmosphere that makes everyone feel at home. This marbled masterpiece isn’t just a treat for the taste buds; it’s a delightful swirl of two classic flavors that immediately elevates any occasion.
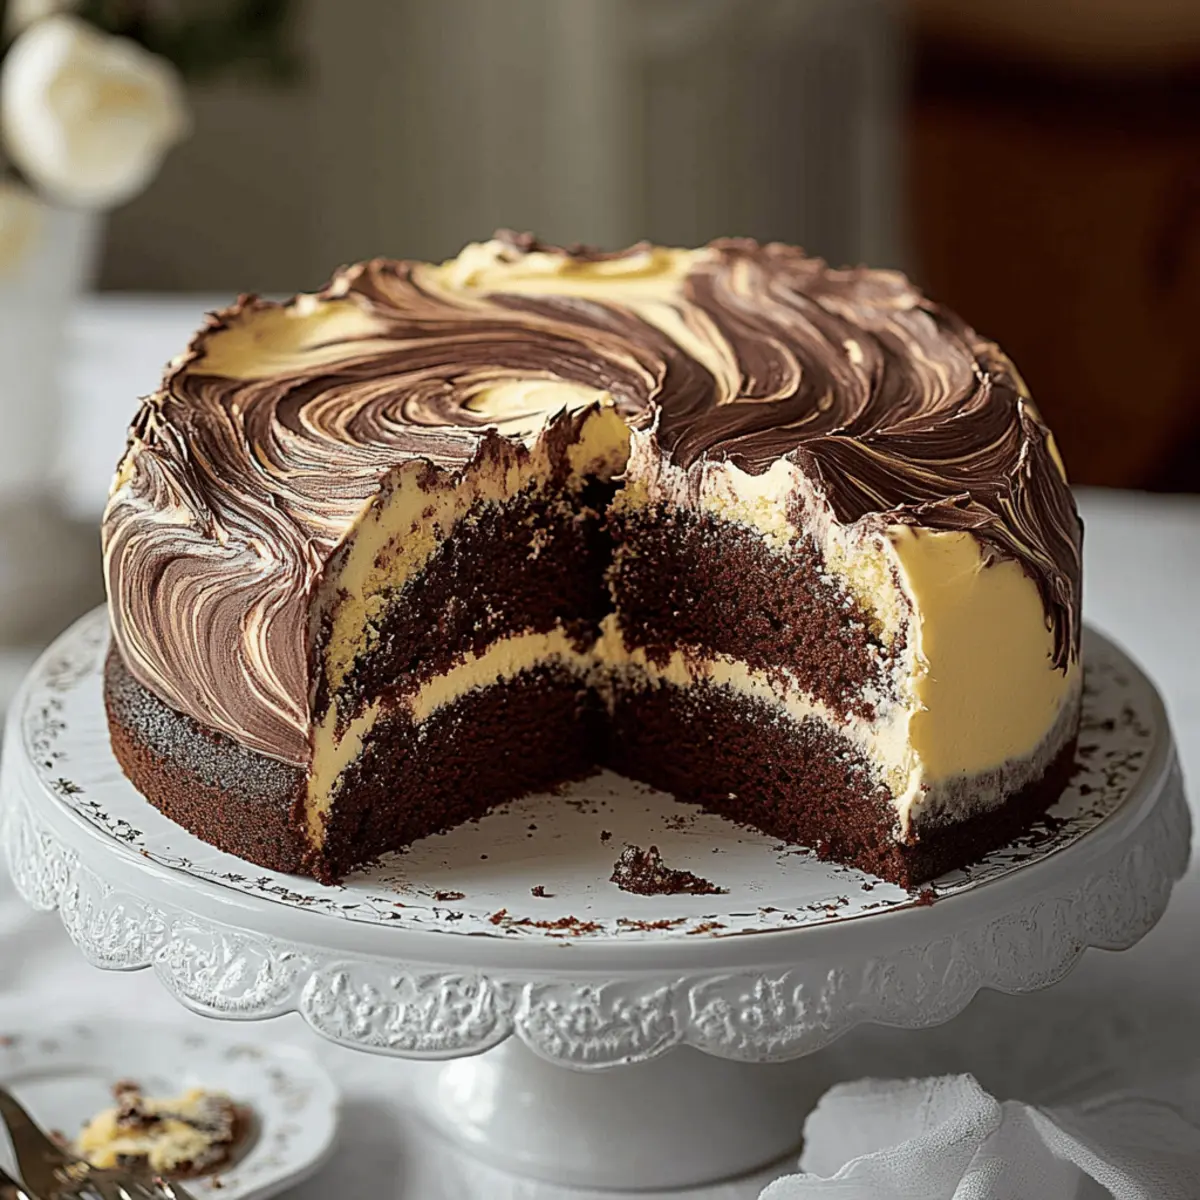
After a long week, whipping up this easy yet impressive dessert feels like a small act of love, whether you’re surprising your loved ones or just indulging in a little self-care. With just a handful of ingredients, you can create a stunning loaf that is sure to impress. Let’s dive into this delightful Marble Cake recipe—your key to sweetening up life’s simple moments!
Why is Marble Cake a Must-Try Dessert?
Nostalgic flavors blend beautifully in this delightful treat, bringing back memories of childhood gatherings. Easy preparation makes it perfect for all skill levels—whip it up on a whim! Versatile enough to serve at any occasion, it satisfies both chocolate and vanilla lovers. Moist and tender, each slice is a comforting piece of home. Enjoy it warm or at room temperature, and watch it disappear from the plate!
Marble Cake Ingredients
Unlock the secrets to a perfect Marble Cake!
For the Batter
- All-purpose flour – This creates the structure of your cake, ensuring it’s fluffy and light.
- Granulated sugar – Adds sweetness and helps to create a tender texture when creamed with butter.
- Baking powder – This leavening agent gives your cake the lift it needs to be light and airy.
- Salt – Enhances flavors and balances the sweetness, making each bite more delicious.
- Unsalted butter – Room temperature butter is vital for creaming; it traps air for a fluffier cake.
- Large eggs – They provide moisture and richness while helping to bind the ingredients together.
- Vanilla extract – This lovely flavor elevates the cake, making each bite a comforting delight.
- Cocoa powder – Essential for the chocolate layer, it gives that beautiful marbled effect in your Marble Cake.
- Whole milk – Adds moisture and ensures your cake remains tender throughout.
This simple yet enchanting Marble Cake recipe will soon have a special place in your heart!
How to Make Marble Cake
-
Preheat the Oven: Start by preheating your oven to 350°F (175°C). This ensures the cake bakes evenly and rises perfectly. Grease and flour a 9×5-inch loaf pan, so the cake releases easily after baking.
-
Whisk Dry Ingredients: In a mixing bowl, whisk together the all-purpose flour, baking powder, cocoa powder, and salt. This step combines your dry ingredients and ensures even distribution, which is key to a consistent texture in your Marble Cake.
-
Cream Butter and Sugar: In another bowl, cream the sugar and room temperature butter using an electric mixer. Mix on medium speed for about 3-4 minutes until the mixture becomes light and fluffy, adding air for a tender cake.
-
Add Eggs and Vanilla: Beat in the eggs one at a time, mixing well after each addition to incorporate fully. Finally, stir in the vanilla extract, which will enhance the overall flavor profile of your cake.
-
Combine Mixtures: Gradually add the dry ingredients to the butter mixture, alternating with the whole milk. Start and end with the dry ingredients to maintain a smooth batter. Mix until just combined to avoid overworking the batter.
-
Prepare for Marbling: Divide your batter into two separate bowls; one bowl should remain plain while you mix cocoa powder into the second. Spoon alternating dollops of each batter into the prepared pan, and then gently swirl with a knife for a lovely marbled effect.
-
Bake to Perfection: Bake your Marble Cake for 50-60 minutes, or until a toothpick inserted in the center comes out clean. Allow it to cool in the pan for about 10 minutes before transferring to a wire rack for cooling.
Optional: Dust with powdered sugar before serving for an elegant touch.
Exact quantities are listed in the recipe card below.
What to Serve with Marble Cake?
Indulging in a slice of Marble Cake opens up a world of delightful pairings that elevate every bite into a cherished moment.
-
Fresh Berries: The bright, tart flavors of strawberries or raspberries contrast beautifully with the rich cake, adding a vibrant touch. Serve them on the side for a refreshing balance.
-
Whipped Cream: Light and fluffy, whipped cream enhances the cake’s texture while adding a touch of sweetness that rounds out the flavors seamlessly.
-
Coffee or Tea: A steaming cup complements the lushness of the Marble Cake, inviting you to pause and enjoy life’s little moments together. The warmth enhances the cake, creating a cozy atmosphere.
-
Chocolate Ganache: Drizzling this rich, velvety chocolate sauce over each slice transforms your Marble Cake into an indulgent dessert masterpiece.
-
Vanilla Ice Cream: The creamy, cold ice cream against the warm cake creates a tantalizing contrast that simply melts in your mouth, making every bite irresistible.
-
Coconut Flakes: Toasted coconut adds a delightful crunch and a hint of tropical flavor that contrasts the richness of the Marble Cake beautifully. A nostalgic touch that brings warmth and texture.
-
Caramel Sauce: A drizzle of velvety caramel over your cake can add a touch of sweetness and decadence, taking your dessert experience to the next level.
-
Toasted Nuts: Walnuts or pecans add a satisfying crunch and nutty flavor that complements the soft, moist cake perfectly, elevating the overall experience.
With any of these pairings, your Marble Cake will shine as the star of your dessert table, warming hearts and creating sweet memories.
Make Ahead Options
These Marble Cake make ahead options are perfect for busy home cooks looking to save time! You can prepare the batter up to 24 hours in advance. Simply follow the recipe up to the point of dividing and marbling the batter; then, cover the bowls tightly with plastic wrap and refrigerate. This not only allows the flavors to meld but also makes your baking day a breeze! When you’re ready to bake, let the batter sit at room temperature for about 30 minutes before spooning it into your prepared pan. This way, you’ll have a fresh, delicious Marble Cake that’s just as delightful as if you made it all in one go!
Expert Tips for Marble Cake
-
Room Temperature Ingredients: Ensure your butter and eggs are at room temperature for better mixing and texture; this helps to create a light and airy Marble Cake.
-
Don’t Overmix: Mix just until combined to avoid developing gluten; overmixing can lead to a dense cake, which we want to avoid!
-
Perfect Swirl Technique: When creating the marbled effect, use a knife to swirl gently. Too much swirling can mix the flavors too much instead of keeping them distinct.
-
Check for Doneness: Insert a toothpick into the center of the cake; it should come out clean or with a few moist crumbs. Baking too long can dry out your Marble Cake.
-
Cool Properly: Allowing your cake to cool in the pan for 10 minutes before transferring it prevents it from breaking, keeping that gorgeous marbled look!
How to Store and Freeze Marble Cake
Room Temperature: Keep your Marble Cake covered with a cake dome or wrap it in plastic wrap for up to 3 days at room temperature.
Fridge: If you’d like to extend its freshness, store the cake in an airtight container in the fridge for up to 1 week.
Freezer: To freeze, wrap individual pieces tightly in plastic wrap followed by aluminum foil. Enjoy the cake for up to 3 months by thawing at room temperature or in the refrigerator.
Reheating: If you prefer warm slices, pop a piece in the microwave for about 10-15 seconds. Enjoy the comforting aroma of your Marble Cake every time!
Marble Cake Variations & Substitutions
Feel free to get creative with this delightful Marble Cake recipe and make it your own!
-
Dairy-Free: Substitute whole milk with almond or oat milk and use vegan butter for a delicious dairy-free delight.
Vegan recipes can often surprise with their flavor and texture, allowing everyone to indulge without compromise. -
Gluten-Free: Replace all-purpose flour with a 1:1 gluten-free baking blend to cater to gluten sensitivities.
This variation keeps the cake light and fluffy while making it friendlier for those with dietary restrictions. -
Add Zest: Stir in a tablespoon of orange or lemon zest to the batter for a refreshing citrus twist.
This brightens up the flavor profile, adding an unexpected yet delightful zing to each bite. -
Nutty Crunch: Fold in ½ cup of chopped walnuts or pecans into the batter for added texture and flavor depth.
Their rich crunch complements the soft cake beautifully, giving it an enjoyable bite. -
Chocolate Chips: Add 1 cup of semi-sweet chocolate chips to the chocolate batter for intense chocolate flavor and gooey goodness.
This simple addition makes your Marble Cake a chocolate lover’s dream! -
Spicy Kick: Mix in a dash of cayenne pepper or cinnamon to the cocoa batter for a bold flavor twist.
A little warmth brings a new dimension, perfect for those who appreciate a hint of spice. -
Seasonal Flavors: Replace cocoa powder with pumpkin puree and add spices like nutmeg and cinnamon in the fall.
This seasonal twist creates a festive version that’s perfect for cozy gatherings! -
Coffee Infusion: Replace some of the milk with brewed coffee for a rich, mocha-flavored Marble Cake.
This enhances the chocolate while giving it an aromatic boost—perfect for coffee lovers!
Marble Cake Recipe FAQs
How do I select the best ingredients for my Marble Cake?
Absolutely! For the best Marble Cake, choose ripe and fresh ingredients. Look for unsalted butter that’s soft yet firm to the touch and eggs that are bright and clean. Granulated sugar should be free of clumps, while your cocoa powder must be rich and dark for that beautiful marbling effect.
What is the best way to store Marble Cake?
For optimal freshness, keep your Marble Cake covered with a cake dome or tightly wrapped in plastic wrap at room temperature for up to 3 days. If you have leftovers, you can extend its life by placing the cake in an airtight container in the fridge for up to 1 week. Just make sure it’s completely cooled before sealing.
Can I freeze Marble Cake, and if so, how?
Very! Freezing Marble Cake is a simple process. First, slice the cake into individual pieces for convenience. Then, wrap each slice tightly in plastic wrap followed by aluminum foil to protect against freezer burn. The cake will stay fresh for up to 3 months. When you’re ready to eat, simply thaw it in the refrigerator overnight or leave it at room temperature for a couple of hours.
What should I do if my Marble Cake sinks in the middle?
Should your cake sink, don’t worry! This can often happen due to overmixing the batter or opening the oven door too early while baking. To prevent sinking, be gentle when combining your ingredients and allow the cake to bake undisturbed until the time is up. If it happens, simply serve it as a rustic dessert and enjoy the delicious flavors!
Is Marble Cake suitable for people with dietary restrictions?
The more the merrier! You can modify the recipe to cater to various dietary needs. For those allergic to gluten, substitute with a gluten-free flour blend. If someone is dairy-free, replace unsalted butter with coconut oil or a dairy-free butter alternative and use almond or soy milk instead. Always check ingredient labels for allergens when baking for others!
How do I keep my Marble Cake moist after baking?
Keeping your Marble Cake moist is key! After baking, let it cool completely before wrapping it for storage. If you feel it’s becoming dry, you can brush simple syrup (made of equal parts water and sugar) over the cake before wrapping. This adds moisture and gives it an extra flavor boost that everyone will love!
Decadent Marble Cake: A Cozy Homemade Delight for All
Ingredients
Equipment
Method
- Preheat your oven to 350°F (175°C). Grease and flour a 9×5-inch loaf pan.
- In a mixing bowl, whisk together the all-purpose flour, baking powder, cocoa powder, and salt.
- In another bowl, cream the sugar and butter using an electric mixer on medium speed for about 3-4 minutes until light and fluffy.
- Beat in the eggs one at a time, mixing well after each addition. Stir in the vanilla extract.
- Gradually add the dry ingredients to the butter mixture, alternating with the whole milk, starting and ending with the dry ingredients.
- Divide your batter into two bowls; one will remain plain and the other with cocoa powder mixed in. Spoon alternating dollops of each batter into the prepared pan, then swirl with a knife.
- Bake for 50-60 minutes, or until a toothpick inserted in the center comes out clean. Cool in the pan for 10 minutes before transferring to a wire rack.