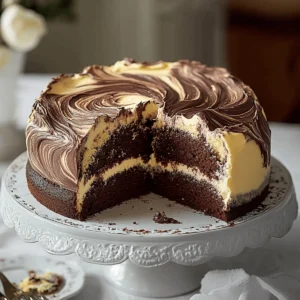
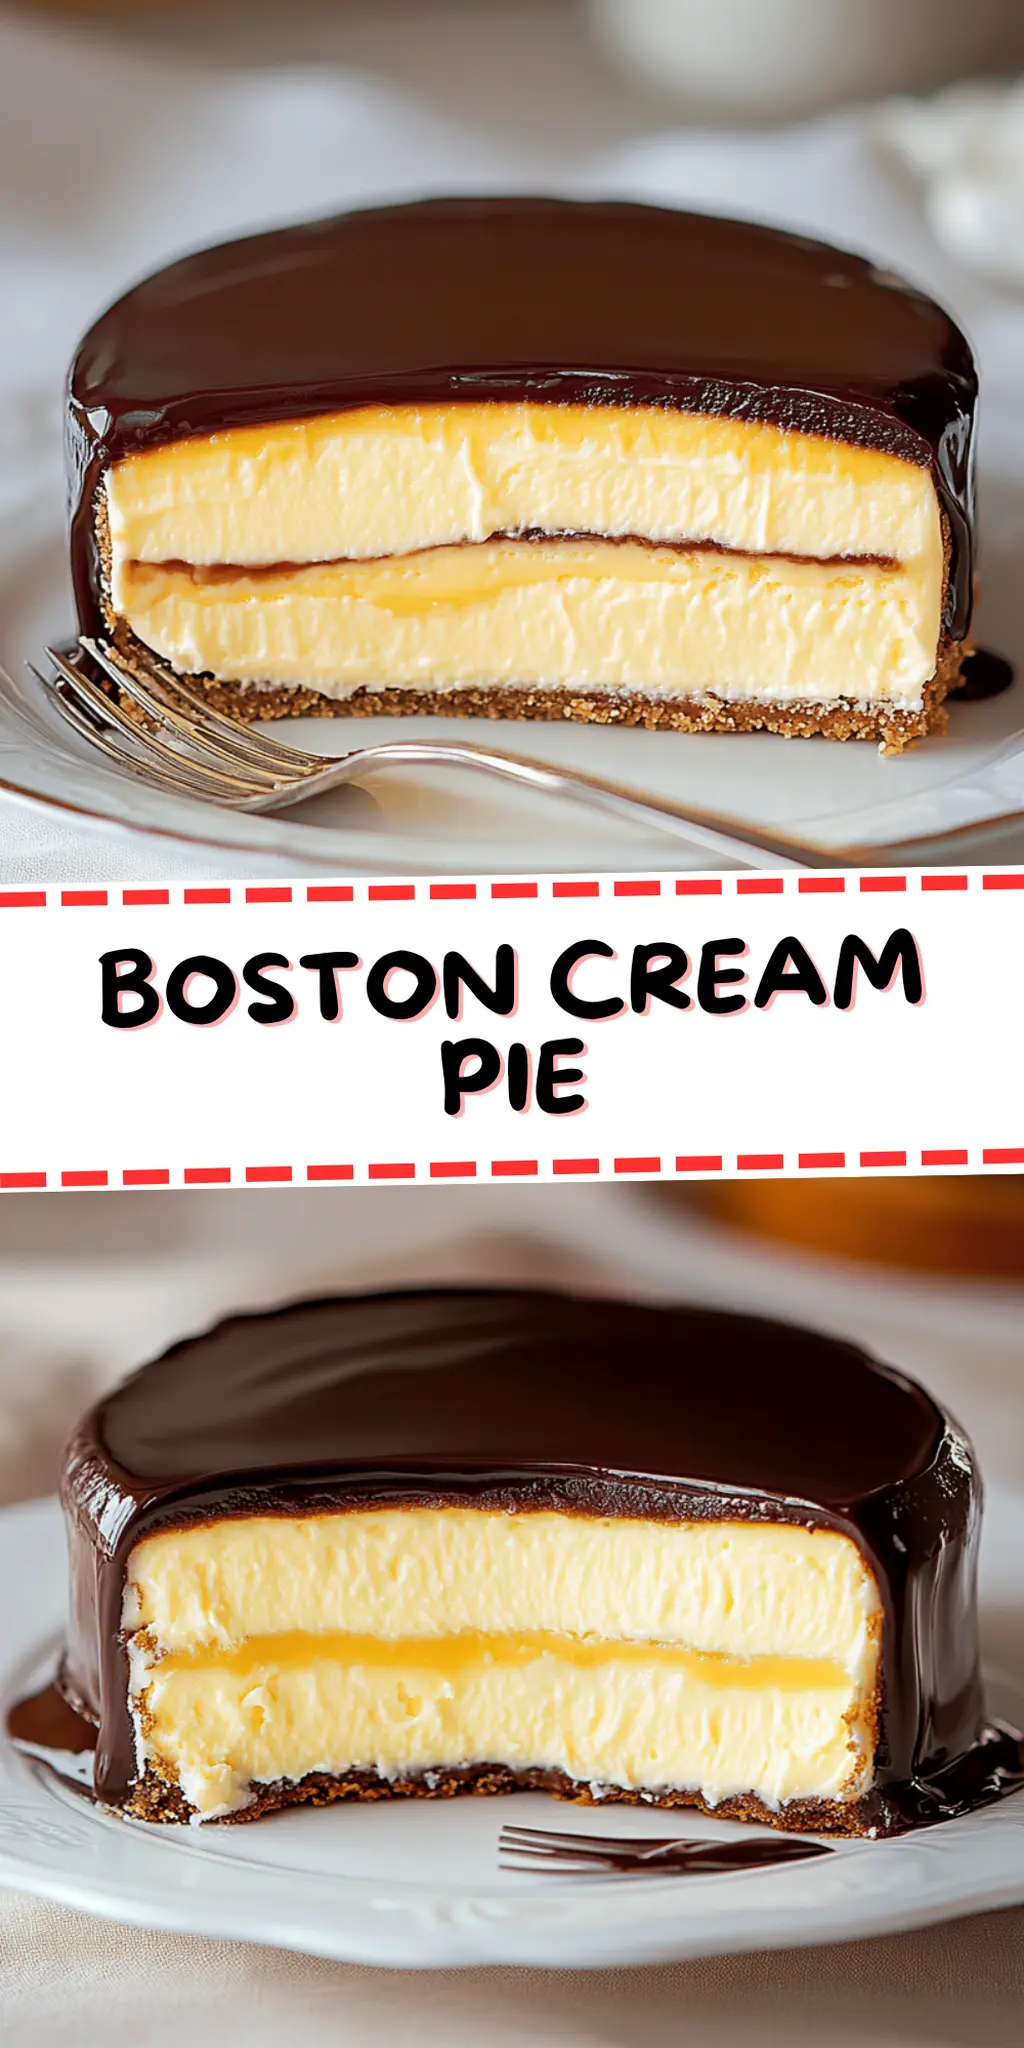
As I walked through my kitchen, the waving scent of sweet vanilla and rich chocolate lifted my spirits instantly. There’s something so inviting about creating a homemade dessert that brings joy to everyone gathered around the table. That’s when I decided to whip up a classic Boston Cream Pie. This isn’t just any cake—it’s a delightful, layered masterpiece combining a fluffy vanilla custard and a decadent chocolate glaze, making it the ideal treat for all occasions.
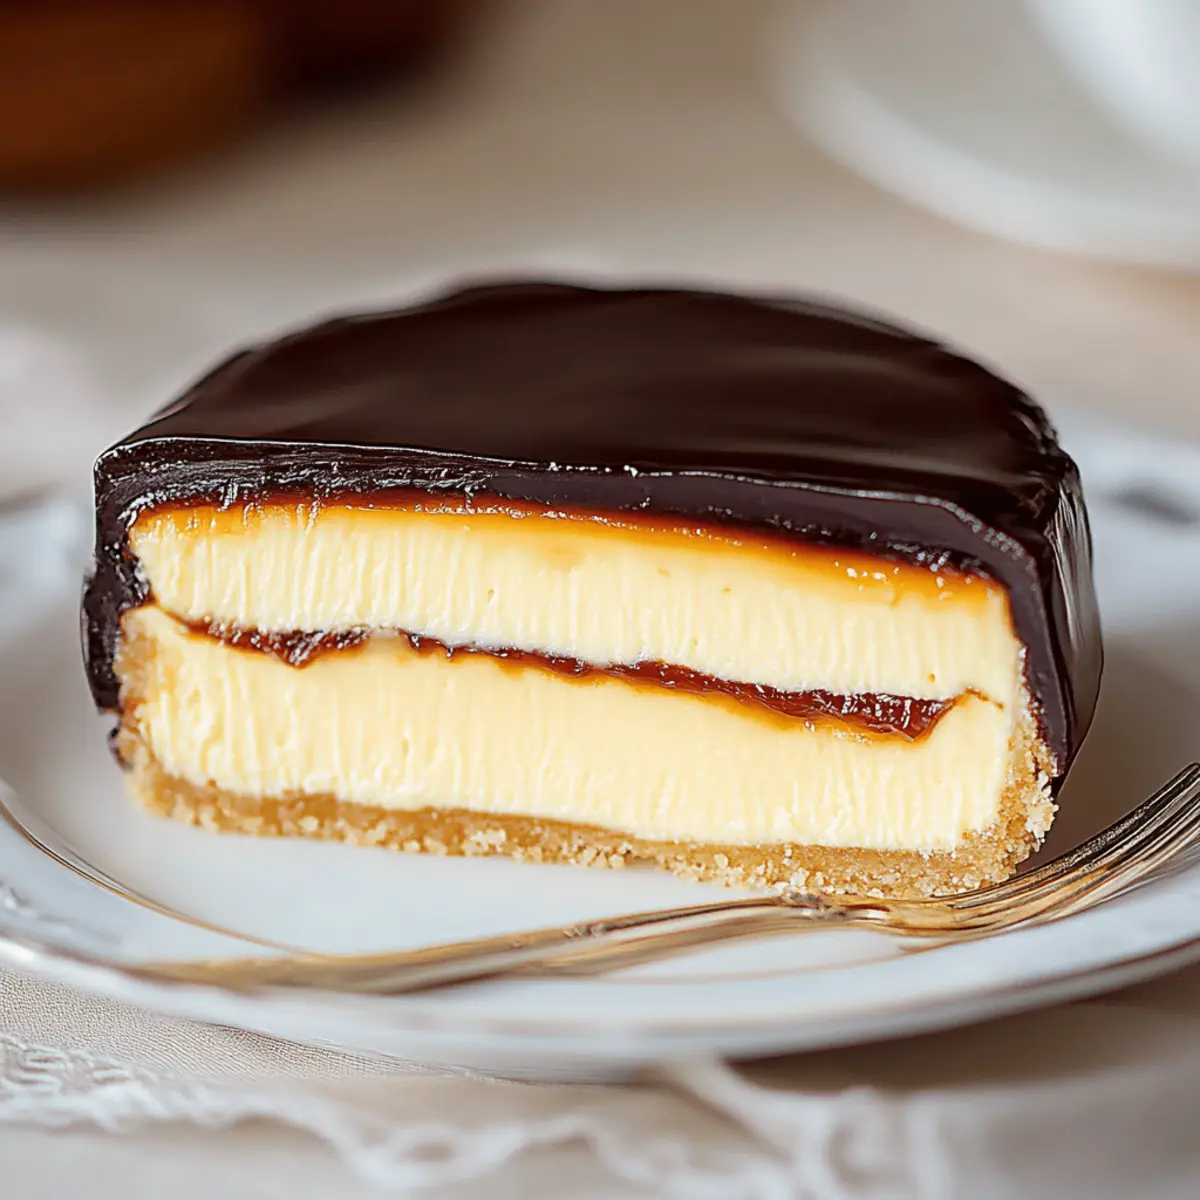
Imagine biting into a slice, the luscious custard oozing out as the smooth chocolate glaze glistens atop. The best part? This recipe comes together effortlessly, making it perfect for both seasoned chefs and those just discovering the joy of baking from scratch. Whether you’re looking to impress friends at a dinner party or simply satisfying a sweet craving, Boston Cream Pie is sure to leave everyone asking for seconds. Join me in crafting this comforting dessert that balances nostalgia and indulgence beautifully!
Why is Boston Cream Pie so irresistible?
Indulgent, there’s nothing quite like the rich chocolate and creamy custard bringing a touch of luxury to your dessert table. Effortless preparation means you don’t need to be a pastry chef to create this showstopper. Layered goodness elevates every bite, offering a delightful mix of textures that keeps everyone coming back for more. Versatile enough for any occasion, it’s the perfect sweet finale, whether it’s a birthday party or a casual weeknight treat. Plus, the aroma of baking will fill your home with warmth and cheer, making it not just a treat, but an experience!
Boston Cream Pie Ingredients
Dive into the delightful components that make up the classic Boston Cream Pie.
For the Cake
- All-purpose flour – provides the structure for the cake; sift it for a lighter texture.
- Granulated sugar – sweetens the cake beautifully and contributes to a soft crumb.
- Unsalted butter – ensures a rich flavor; remember to let it soften for easy mixing.
- Whole milk – adds moisture and rich flavor; feel free to use buttermilk for tang.
- Large eggs – helps bind ingredients; make sure they’re at room temperature for best results.
- Pure vanilla extract – infuses a delightful aroma; opt for high-quality for richer flavor.
For the Custard
- Cornstarch – thickens the custard, giving it that luscious, creamy consistency; don’t skip on this!
For the Glaze
- Bittersweet chocolate – creates a rich, indulgent topping; semi-sweet can be used for a sweeter option.
- Heavy cream – gives the glaze a silky texture; substitute with coconut cream for a dairy-free option.
How to Make Boston Cream Pie
-
Preheat oven Preheat your oven to 350°F (175°C) and grease two 9-inch round cake pans. This step ensures your cake layers come out smoothly and easily.
-
Cream butter and sugar In a mixing bowl, beat together the unsalted butter and granulated sugar until light and fluffy, about 3 minutes. This creates a lovely base for your cake.
-
Incorporate eggs Add the large eggs one at a time, mixing well after each addition. Then, stir in the pure vanilla extract. This process helps to create a well-emulsified batter.
-
Mix dry ingredients Sift in the all-purpose flour and cornstarch. Mix until just combined, taking care not to over-mix. The batter should be smooth but not too thick.
-
Bake the layers Divide the batter evenly between the prepared pans and bake for 25-30 minutes, or until a toothpick comes out clean. The cakes should be lightly golden on top.
-
Prepare the custard For the custard, whisk together whole milk, sugar, cornstarch, egg yolks, and vanilla in a saucepan over medium heat. Stir continuously until the mixture thickens; it should be creamy and luscious.
-
Make the glaze For the glaze, melt the bittersweet chocolate with the heavy cream in a small saucepan over low heat until smooth. Allow it to cool slightly before pouring it over the assembled cake layers.
Optional: Garnish with fresh berries for an elegant touch!
Exact quantities are listed in the recipe card below.
How to Store and Freeze Boston Cream Pie
Fridge: Store any leftover Boston Cream Pie in the refrigerator for up to 3 days. Keep it covered with plastic wrap to maintain its freshness and prevent the custard from drying out.
Freezer: If you want to enjoy your Boston Cream Pie later, you can freeze it without the glaze. Wrap it tightly in plastic wrap and then in aluminum foil for up to 2 months.
Reheating: When ready to enjoy, thaw the pie in the refrigerator overnight. If the custard has thickened, you may gently warm it on the stove while stirring to restore creaminess before serving.
Serving Tips: For the best experience, re-glaze the pie with fresh chocolate after defrosting. This will bring back that beautiful, smooth finish that’s so enticing!
Boston Cream Pie Variations
Customize your Boston Cream Pie to suit your tastes, creating delightful twists that’ll tantalize your senses!
-
Gluten-Free: Swap all-purpose flour for a gluten-free blend. It gives a beautiful texture without sacrificing flavor. Enjoy gluten-free goodness with the same delightful essence!
-
Dairy-Free: Replace whole milk and heavy cream with almond or coconut milk and coconut cream for a luscious dairy-free version. It’ll still be rich and creamy, and the hint of coconut adds an extra layer of delight!
-
Coconut Flavored: Stir in a bit of coconut extract to the custard for a tropical twist! This offers unexpected flavor while complimenting the rich chocolate.
-
Fruit-Infused: Add chopped berries or banana slices between the layers for a fruity surprise. These additions create a fresh contrast to the rich custard and chocolate flavors!
-
Lemon Zest: Incorporate lemon zest into the custard for a refreshing citrus hint. The zest lightens the dessert, making each bite a dreamy balance of flavors.
-
Nutty Crunch: Sprinkle some crushed nuts between the cake layers for added texture. Walnuts or almonds will add a delightful crunch that complements each smooth bite.
-
Extra Chocolate: Fold cocoa powder into the cake batter or use a dark chocolate ganache for a more decadent chocolate experience. Satisfy every chocolate lover with ultra-rich flavors!
-
Spicy Kick: Add a pinch of cayenne pepper or cinnamon into the chocolate glaze for a surprising warmth. This twist pairs intriguingly with the sweet and creamy elements!
What to Serve with Boston Cream Pie?
As you savor each rich bite of this delightful dessert, consider enhancing your meal with perfect pairings that harmonize beautifully.
-
Vanilla Ice Cream: This classic pairing adds a smooth, creamy element that contrasts perfectly with the richness of the chocolate glaze. The cold vanilla melt complements the warm dessert, creating a delightful temperature play.
-
Fresh Berries: Lightly sweetened strawberries or raspberries bring a burst of freshness that cuts through the sweetness. Their tangy flavor adds a lovely brightness, making each bite even more enjoyable.
-
Coffee: A rich cup of coffee is the ideal way to balance the sweetness of the Boston Cream Pie. The bitterness of the coffee enhances the chocolate notes, making each sip a delightful experience.
-
Whipped Cream: A dollop of lightly sweetened whipped cream adds an airy texture and creamy contrast. This makes every slice more indulgent and visually appealing, turning dessert time into a celebration.
-
Chocolate-Dipped Strawberries: Elevate your dessert by serving chocolate-dipped strawberries alongside. They echo the flavors of the Boston Cream Pie while offering a fun, finger-food experience.
-
Nutty Biscotti: For a crunchy contrast, serve crunchy biscotti on the side. Their nutty flavor and crisp texture create a delightful contrast to the moist cake, making every bite more exciting.
-
Sparkling Water: Refreshing sparkling water or a light spritzer offers a palate cleanse, ensuring that the dessert remains the star of the show. It’s a lively addition that keeps the meal feeling light and festive.
-
Chocolate Mousse: For those who crave even more chocolate, a small serving of chocolate mousse complements the Boston Cream Pie beautifully. The rich textures combine joyfully, making it a divine pairing for chocolate lovers.
-
Coconut Macaroons: These sweet treats bring an exciting twist to the dessert table. Their chewy texture and coconut flavor create an enticing contrast alongside the silky smoothness of the pie.
Make Ahead Options
These Boston Cream Pie layers are perfect for meal prep enthusiasts and make your baking endeavors a breeze! You can bake the cake layers up to 3 days in advance; simply allow them to cool completely, then wrap them tightly in plastic wrap and refrigerate to keep them moist. The custard filling can also be made up to 24 hours ahead, just store it in an airtight container in the fridge to prevent a skin from forming. On the day of serving, prepare the chocolate glaze—just melt it fresh and pour it over the layers. This way, you’ll achieve a stunning dessert with minimal effort on the day of your gathering, leaving everyone impressed and satisfied!
Expert Tips for Boston Cream Pie
-
Room Temperature Ingredients: Ensure your eggs and butter are at room temperature for a smoother batter that rises beautifully during baking.
-
Don’t Overmix: When combining flour and wet ingredients, mix until just combined to avoid a dense cake.
-
Cooling Time: Allow the cake layers to cool completely before frosting; this helps prevent the glaze from melting into the cake.
-
Thickening Custard: Stir the custard continuously on medium heat to achieve a thick, creamy texture and prevent it from scorching.
-
Chill the Glaze: Let the chocolate glaze cool slightly before pouring; this helps it set better on the cake layers and reduces drips.
-
Decoration Ideas: For an elegant presentation, consider garnishing your Boston Cream Pie with fresh fruit or shaved chocolate!
Boston Cream Pie Recipe FAQs
How do I choose the right eggs for baking?
Absolutely! When selecting eggs for your Boston Cream Pie, look for fresh eggs that are clean and free from cracks. Check the sell-by date on the carton, and opt for large eggs for consistency in recipes. Room temperature eggs mix better into your batter, providing a lighter texture, so take them out of the fridge about 30 minutes before you bake.
How should I store leftover Boston Cream Pie?
After indulging in your delicious homemade Boston Cream Pie, keep any leftovers in the refrigerator for up to 3 days. Cover it lightly with plastic wrap or foil to keep it fresh. This will help maintain the custard’s creaminess and prevent it from drying out, while also protecting it from absorbing any other odors in your fridge.
Can I freeze Boston Cream Pie, and how do I do it properly?
Very! You can freeze Boston Cream Pie for up to 2 months, but I recommend freezing it unglazed. To do this, wrap each layer tightly in plastic wrap, followed by aluminum foil to avoid freezer burn. When you’re ready to enjoy, let it thaw in the refrigerator overnight. If the custard thickens, gently warm it on the stove while stirring until it regains its smooth texture.
What if my custard doesn’t thicken properly?
No worries! If your custard isn’t thickening, make sure you’re cooking it over medium heat while continuously stirring. This prevents it from scorching and helps evenly distribute the heat. If it’s still too runny, whisk together a little cornstarch with cold milk and gradually incorporate it into the custard mixture, cooking it a bit longer until it thickens to your liking.
Are there any dietary considerations I should keep in mind?
Absolutely! If you have friends or family with dietary restrictions, you can modify your Boston Cream Pie. For dairy-free options, substitute the heavy cream with coconut cream and use a plant-based butter. If someone has an egg allergy, there are egg replacers available, such as flax eggs or commercial egg substitutes, but keep in mind that texture and flavor might vary slightly. Always check with your guests to tailor the recipe to their needs!
Indulgent Boston Cream Pie That'll Steal the Show at Dessert
Ingredients
Equipment
Method
- Preheat your oven to 350°F (175°C) and grease two 9-inch round cake pans.
- In a mixing bowl, beat together the unsalted butter and granulated sugar until light and fluffy, about 3 minutes.
- Add the large eggs one at a time, mixing well after each addition, and stir in the pure vanilla extract.
- Sift in the all-purpose flour and cornstarch, mixing until just combined.
- Divide the batter evenly between the prepared pans and bake for 25-30 minutes, or until a toothpick comes out clean.
- For the custard, whisk together whole milk, sugar, cornstarch, egg yolks, and vanilla in a saucepan over medium heat, stirring continuously until thickened.
- For the glaze, melt the bittersweet chocolate with the heavy cream in a small saucepan over low heat until smooth.